
 "Building the Dream in Cottage Country | 3-Car Garage and Loft")

While the excavation of the property was taking place, and the foundations for the garage and cottage were being poured, the crew kept themselves busy building a dock (a priority in cottage country!) Here's a panoramic view of the job site after the foundations for the garage and cottage were poured:

The garage, which is on the left, was the first major project. Here's a closeup of the foundation:

The vision: 3-car garage with plenty of room for all of the toys one's heart desires when living the cottage life. Oh! And my most favourite feature; a second story loft! After the concrete for the floor had been poured, and the earth around the foundation was filled back in, Kent Carpentry got to work.
First step... Walls!

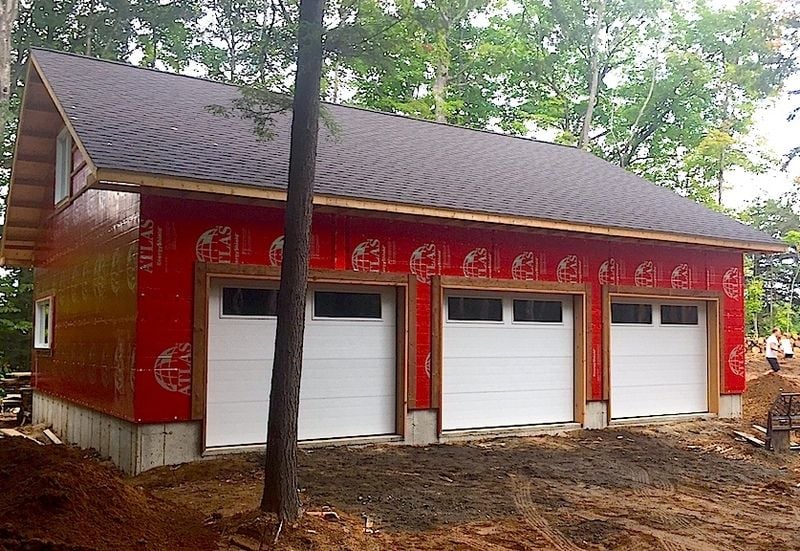
Flash forward a couple of weeks and we have a second story, a hand-cut roof, and plywood sheeting on the walls. I think it's safe to say that the home owner will be able to fit an ATV or two in there!


Finally, my personal favourite... The Loft. If this was my space I don't even know what I would do with myself... I'm having visions of stone accent walls, a live-edge bar, and faux beams. I am SO excited to see what the owners decide to do with this space! I'll be sure to keep you posted.

Add some shingles, windows, and garage doors and Voila!

Kent Custom Carpentry is able to assist with all of your carpentry and construction needs, whether it be a renovation of a single room in your existing home, a large-scale addition, or a custom new-build. We'd love to hear about your next project!
| Posted in:GarageDesignBlogCarpentryCustom |


I also sanded the white side a bit to remove any dirt and let some of the wood show through. Here was the result:

Some of the trim around the glass panes fell out during the sanding process, but a little wood glue fixed it right up:


Unfortunately, the picture wire that I had on hand wasn't strong enough to hold such a hefty frame, and so I'll have to make a trip to the hardware store to get some thicker gauge stuff.
I taped in some childhood photographs to get a feel for what it would look like. I'm pretty pleased with the final product, although I think it will look even more spectacular with some old black-and-white family photos. I can't wait to hang this one-of-a-kind rustic creation on the wall!


| Posted in:DecorDistressedRefinishDesignBlogCarpentryCustom |
Cooking is my passion, my favorite pastime, and my preferred way to relieve stress. I rarely eat out, and when I do I am usually disappointed. That said, the focus of my concern before and during this renovation has been my kitchen.
This may sound bizarre, but I wasn't worried that I would need to pack the majority of my belongings into a storage unit, or that we would have only one 10x10 room to function as a combination bedroom, living room, and office. It was not that we would have no walls or insulation, nor was I worried that I would sweat to death due to lack of an air conditioner.
Don't get me wrong, my pre-renovation kitchen was not fantastic (see below), but it was functional and comfortable and it served me well. The major issue was that a wall in the kitchen was acting as the gateway between our existing house and the rear addition. Consequently, in order to join the old and the new, the entire kitchen would need to be gutted.


<--This entire wall needed to be removed -->
Another cause for my anxiety was that this would not be your typical 4-5 week kitchen renovation. Due to the tremendous scope of our reno, once the kitchen was gone, there would not be a new one for months. I continually delayed the kitchen demolition, but there came a time when I couldn't hold off any longer and away it went.


I must tell you that it has been 7 weeks since those photos were taken, and there is still no semblance of my new kitchen in sight. Surprise! I have not yet wasted away. My talented and thoughtful husband created a temporary kitchen to keep me sane (and to keep himself fed!).


It's certainly nothing to brag about but it has everything I need: prep space, storage, a sink, and a stove. I have managed to make some pretty impressive meals in this makeshift kitchen. In fact, I whipped up this gluten-free spaghetti a la puttanesca last night:

I think Jamie Oliver would be proud!
Based on my experience thus far, I would like to offer a few pieces of advice for anyone planning to undergo a kitchen renovation:
1. Plan every aspect of the kitchen renovation and order all materials well before it gets underway - you don't want there to be a delay because the tile, plumbing fixtures, or appliances haven't arrived.
2. Don't feel that you need to eat out every night - you can create a culinary masterpiece without a chef's kitchen.
3. Prepare meals in advance - before demoing the kitchen, I prepared, portioned, and froze a variety of meals including chili, pasta sauce, marinated chicken, soups, casseroles, curries, and even meat for burgers. I just defrost, reheat, and enjoy a home-cooked meal with none of the mess.
4. Pack up anything that isn't an absolute necessity - renovations can lead to disorganization; the less stuff you have in the way, the easier it is to stay organized.
5. Create a temporary kitchen - set up in an area that won't interfere with your kitchen reno and make it as functional as possible.
| Posted in:AdditionKitchenDesignBlogCarpentryCupboardsCustom |
Before we broke ground for our renovation (also referred to as Hurricane Kent), I had all of these fantastic ideas that I would blog about it along the way. Then reality happened, and in the blink of an eye we were living in the midst of utter chaos. Although we are still in the thick of it, and will be for sometime, I figure if I'm going to share my experiences with you, it's now or never!
Six years ago we moved into our first home. At the time, it was a dream come true and the house was everything we could ask for: 3 small bedrooms, a bathroom, an eat-in kitchen in decent condition, a living room, an unfinished basement, and a sunroom. The main allure was the location, Flamborough, and the large private lot... 100 feet x 300 feet with neighbours on either side and tended farmer's fields both in front of the house and behind it.


We were content and a few years passed. I graduated university and then teacher's college, Nick worked hard and his business progressed, we got a dog, Nick proposed and in 2012 we got married. As for the house, we did some minor fixing up and Nick built us a walnut office unit in one of the bedrooms, a 'barn' shed, and we refinished our only bathroom (that's a story for another time!). During this time we hosted many parties and became known for our 'family dinners' that quickly turned from inviting a couple of friends over for a meal into having 20 or more dinner guests. We burned many bonfires, shared many beverages, and made memories to last a life time in our little house.
From time to time, we would discuss our future plans for the house. Would we move? Would we renovate? If we renovated, would we add a second story? Did we want the house to remain a bungalow? How many bedrooms and bathrooms? What about the basement? I would sketch up rough plans, and we would dream. In the spring of 2014, we decided to take the leap and turn our dreams into a reality. This is when the real planning began.
What did we want? The answer was a dining room, a bigger kitchen (for the foodie in me!), a master bedroom with an ensuite bathroom, a front porch, a deck, and a finished basement. What did we need? A new septic tank and water system (the joys of country living!), and to fix water issues in our basement by regrading and waterproofing the foundation. After much research, and of course Pintresting, we drew up a fairly accurate portrayal of what we were looking for in our dream home. The next step was to find an architect, and after meeting with Riju's Home and Design Ltd. things started to become real. Based on our plans, their design input, and many, many revisions, this was the end product:


Needless to say, we were extremely excited at this point, but our renovation story certainly doesn't end here. In fact, this blog post is like the foreward to a trilogy, and in real life we are just finishing up the first book. I would love to share our trials and tribulations, choices, and triumphs that we experience along the way... but for now, I need put my workboots on and go get 'er done!
| Posted in:AdditionDesignBlogCarpentryCustom |
 "So Fresh and So Clean... White Cabinetry is all the Rage in 2015")
Browsing through photos of recent projects I have noticed a continuing trend. In the past year or so. Client requests for wood cabinetry seem to have disappeared almost completely and have been replaced by a demand for units in subtle yet radiant white. You may wonder why, when wood provides such rich colouration, but the photos of our white built-in units are proof that white is not boring, but eye-catching and vibrant. Any one of these custom pieces has the potential to make you the envy of every person who enters your living room.
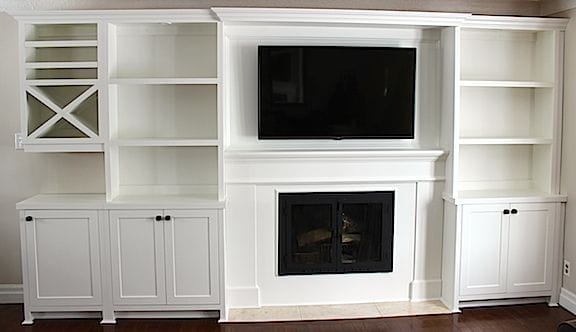
Take this custom designed and built entertainment and fireplace unit that we created for a client recently. The enclosed cupboard space provides ample room for the items that you would rather keep hidden behind closed doors. The open shelving is the perfect blank canvas for you to add your own touch to your living space... and the wine racks, well, who can so no to that?
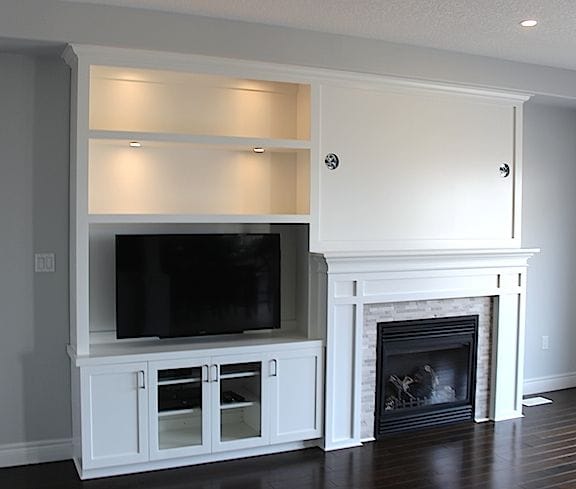
This second custom unit - designed by Claire Jefford of Creating Contrast Designs - is the picture of monochromatic perfection. The integrated lighting is a magnificent way to illuminate your decor and brighten your living space. The glass-insert cupboard doors allow these homeowners to hide unsightly electronics, such as the cable box and Blu-Ray player, while still allowing for them to be operated by remote control without opening a door. The contrast between the white cabinetry and the wood flooring is completely fantastic, and the detailing around the fireplace is distinctive without being overwhelming. Just wait until the above-the-fireplace big screen television is installed!
Check out our Built-In Cabinetry Project Gallery for more custom cabinetry creations by Kent Custom Carpentry.
| Posted in:BlogCarpentryCupboardsShelvesCustomBuilt-inEntertainment UnitFireplace |


Hamilton, Halton, Wellington, Niagara,
GTA, and the Parry Sound area.